Monday, January 27, 2014

Papier-mache has begun!


Just thought I'd take a moment to share with you how my DragonWing Arts students are doing on their flying pigs!

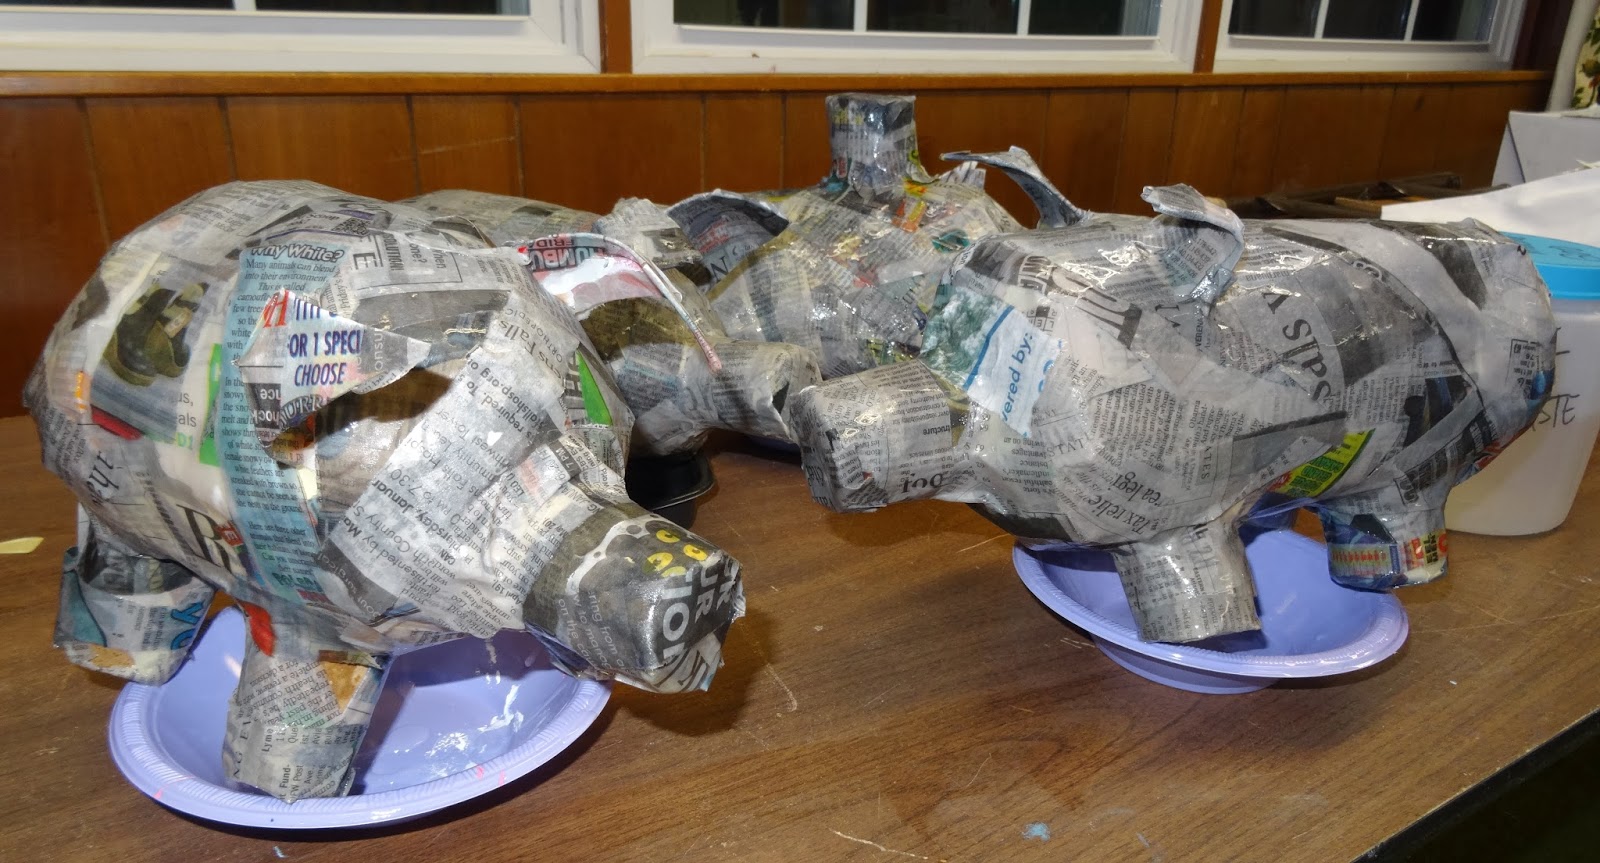
I've mentioned this many many times before on the blog, but if you are a newer reader, you might not realize that I am positively smitten with papier-mache.  It's just got SO many possibilities.  But since these students are relatively new to me, and since our time is limited, rather than tackle something extreme, I decided to select a project for them that is foolproof easy, tried and true.
 

Many of you worry about papier-mache dripping all over the place and the mess.  I contend that, if done MY way, you'll have better results, it will be ridiculously easy to clean up, and they will dry much faster because you won't be using too much goo.

To make a long story short - do NOT dip the newspaper strips into the goo!  I know that's what most of you do - you dip them, and then 'scissor' off the excess with your fingers.  Instead, try this:  dip your FINGERTIPS into the goo.  Then rub it on the palm of your hand.  Touch a finger to a newspaper strip to pick it up, and rub it between your palms to saturate with goo.  It should look translucent, but not be drippy.  (Note the great vocabulary words you can teach: translucent and saturate!)  Then put the strip on the project, and give it a massage.  Repeat for the next strip; and the next; and the next....    When done for the day, make sure the whole thing is massaged nicely to smooth in rough edges or paper sticking up. 

Meanwhile, my students are also beginning a crazy favorite project of mine, 'toothpaste batik'!!  Some of you use a similar process using a resist of washable white or blue gel glue.  I've tried that and found that it is very challenging to wash out.  So we use a mix of white toothpaste and aloe vera lotion that I purchased at the dollar store.   I mix it 50/50 for the resist.  I'll be posting more about this process (and I've posted about it several times before; you can find six of these the posts via my labels at the bottom of the blog.  Just click on the label 'toothpaste batik'.).  In the meantime, I've gotten a sample started for the kids, and one of the girls has an abstract design that she has begin. Here's a sneak peak:
My sample frog, with the resist newly painted on
 Below is a student piece.  The design was drawn on paper, traced with Sharpie, and taped to a board.  The fabric was taped OVER the paper, so the Sharpie design shows through.  This way there are no pencil lines on the fabric to annoy you later! We'll be working on them again on Thursday, so I'll show you more details of the process then, I promise!  
Meanwhile, stay warm, everyone!

Sunday, January 19, 2014

Flying pig construction for papier-mache

My pig "Daisy"
Flying pigs are coming to life!  Students in my after school program DragonWing Arts  have began construction of piggies in preparation for papier-mache.  (They have not yet sprouted wings.)
For those of you who struggle with papier-mache, plastic bag construction offers enormous flexibility, and it is ridiculously easy.  The pig is a great project for a first-timer, since a bread bag is not too big, and a great shape to work with.

First you stuff the bag with crunched up newspaper, one page at a time.   Even a smallish bag from a loaf of bread, such as we are using here, will take quite a few pieces of newspaper to fill, since you want it fairly firm.   When full, the end of the bag gets tied, rubber-banded, twist-tied, or taped (whatever works!)  You won't see that end on the piggies in these photos, since their snouts have been built over the taped bag ends. 
The piggie above looks like he's on the run, or perhaps his arms and legs are stretched out Superman-style.  After all, he will be flying!

Masking tape is used to shape the bag as desired.  For the pigs, that simply means taping in any corners, but if you were making, for example, a bug, you might want to tightly tape a 'waist' to separate body parts.  This process of taping bags was used  for other papier-mache student work I've shown you over the years.  Look at these posts to find a Laurel Burch style cat, and a frog (among other things) made by former students, and an assortment of critters made by me as samples, including a lizard found in  this post.
 The legs were each made from 1/2 toilet paper roll, and the snout was another portion of a toilet paper roll.  The ends were cut with a number of slashes to 'flower out' the end for handles for taping.  The kids were instructed to tape around them in a tick-tac-toe shape.   This holds it on the best.  Then additional tape was added as needed.  They were stuffed with newspaper and the ends were taped over.
The ears were cut from cereal box cardboard, though the piggie above does not yet have his ears attached.  We cut the ears bigger than needed, slashed them once and overlapped the parts to form a curve, and hot glued the overlap.  The bottoms were slashed once again to form tabs to attach them to the piggie.  All the slashing, folding, and taping is the reason you need to start with such a large ear shape!

We will be using cereal box cardboard to add the wings, after the piggie has been papier-mache'd.  This will make the papier-mache process go more quickly.   You can see some finished papier-mache flying pigs, made by my former 5th graders, here.   

Next week, my students will be embarking on gooey papier-mache, my personal favorite thing ever!  In the meantime, the pigs already have names such as Piggly Wigglebottom (which will probably change several times before completion).

By the way, I'm often asked why I don't like using balloons for papier-mache.  I've told the story here on the blog before, but here it is again:  My town has a HUGE annual hot air balloon festival every year, so one year we decided to start in the fall with papier-mache hot air balloons.  At the end of the day there were more than 40 wet projects on my windowsills, in my drying cabinet, and on the counter.  I was in school quite late that afternoon, all alone except for a custodian, when I heard gunshots.  Or at least that's what I thought.  One after another, the balloons starting popping.  I'm assuming it was due to an end of the day temperature change in the building, perhaps?  I nearly jumped out of my skin!  More than 1/2 the projects popped, and I spent about another hour, blowing up new balloons into each one of the collapsing art projects.  I absolutely NEVER want to do that again!!!!  Boy were my lungs tired!
 Has anyone else ever had a balloon experience like mine?

Thursday, January 16, 2014

Followers, conventions, conferences, and random thoughts

As of this writing, I have 964 followers on my blog; I want to reach 1000!  If you told me, when I started this blog about three years ago, that I'd have this many people interested in reading my blog, I'd have said "yeah, that will happen when pigs fly!"  But, of course, an art room is a place where pigs DO fly!!
 When I do reach that magic 1000 followers, I plan some sort of giveaway to celebrate, so if you aren't yet a Google follower of this little old blog, please join yourself up!  Even though Google Reader isn't around any more, you can still see the blogs you follow and jump directly to them through the dashboard when you want.
Meanwhile, while I'm here writing, I'm wondering who is going to be at the NAEA convention in San Diego in March.  I'm not one that usually acts on a whim, but I'm considering making the trip.  Can you convince me it will be worth the cost for a retired teacher to fly clear across the country?  Zip!  Just like that!! 

dragon, grade 3
cat on flying carpet, grade K
grade 2 homage to Lichtenstein
Chuck Close at NAEA conference in NYC, 2012
While we are here talking about conventions, what about the upcoming online conference  I've seen so many of you posting about?  I wasn't planning to attend, since so much of it is geared toward the teacher working in a school, dealing with the issues and challenges that presents.  My teaching nowadays is a struggling-to-get-off-the-ground after school art enrichment program, with small classes and no concerns about assessments, evaluations, data collections, Common Core, and so on.  Our focus is simply on making art and enjoying the process of creativity.  Anyhow, are you attending?  Are you  teaching a session?  If so, how did that come about?  Tell me more!


Wednesday, January 8, 2014

My crazy DIY dress project!

 
It's done! It all started with a pile of conference T-shirts, plus a couple of others.  Each year, I get a voucher at my annual conference to spend at the 'conference store'.  The voucher is a perk of teaching workshops at the conference, and I use them to pick up a conference T-shirt.  But here's the problem.  I don't EVER wear these T-shirts.  They don't fit well.  My hips are too large for a small, but a medium is huge on my shoulders.  And I despise the necklines.  So I cut out the necks and made them into scoop or V-neck shirts figuring I'd wear the ill-fitting shirts to the gym or tromping in the woods.  But  I discovered that, even though they looked a little better without the hideous necks, the cheap T-shirt fabric is hot and scratchy, definitely not gym-wear.  So they sat in a drawer, until I decided to do something with them.
After much deliberation and experimentation,  I made this dress/tunic, using quotes I found on the shirts.  I hope that Cassie Stevens is proud of me for this sewing project! 
 This piece on the back is from a T-shirt that I got, I swear, probably 20 years ago, when I renewed a subscription to School Arts magazine.  It was softer than the conference shirts, and I wore it until it was getting yellowed and threadbare.  This was a good way to rescue it.  Here's a close up of "How to be an Art Teacher".
 Got Art?, anyone?
 My sleeves!
 For the first time, I was actually able to use my duct tape dressmaker's dummy, Violetta, to help fit the garment, and it worked like a charm.  I was able to narrow the shoulders and shorten the torso, while getting the loose-fitting shape that I wanted in the body.  In case you don't remember, here's Violetta:
My original plan was to cut the shirts in to rectangles and piece them together like a puzzle, but that just wasn't a workable idea.  Instead, I selected a comfy very deep violet knit fabric, and cut out the various parts of the tunic.  Then, I used WonderUnder to adhere the random odd shaped quotes onto the dress pieces, and I zigzagged around them to give them a more finished look.  Once that was done, I was able to sew together the whole shebang!

On the front of my tunic:
 A close-up of the front:
 Look carefully on the table next to me, in front of the clock.  If you really  LOOK, you will see a little stuffed Adirondack black bear.  His name is Nelson (he was named after Nelson Mandela), and he has traveled to South Africa and back to live in my home.  You can read the story of how he came to live in my house, and the saga of his travels in this post I wrote in March 2011!

Monday, January 6, 2014

Michael Oatman, MASS MoCA, and my state art conference part four!

all utopias fell, by Michael Oatman
Back in November I told you about my family visit to MASS MoCA (the Massachusetts Museum of Contemporary Art),  but I never got around to telling you about one really special installation at the museum.  Later that same month I attended my state conference, and was very excited because Michael Oatman, the artist responsible for this remarkable piece,  was scheduled as one of the speakers at the conference.  He didn't disappoint!
 
The installation I am referring to is called all utopias fell, and and includes a 'crash-landed satellite' (actually a 1970's era Airstream trailer) pictured at the top of this post and directly above.  To reach it, you have to walk up a scary staircase in a creepy boiler room, and head out on a catwalk up in the air where the Airstream sits, tattered parachutes blowing in the air around it.  We were there on a particularly nasty day, which added to the surreal effect of the location of the piece. 
 The stairs in the boiler room, going back down
one of the parachutes

Inside the Airstream is the Library of the Sun, also part of the installation.  Michael Oatman invented a whole story around this installation, and I can't begin to explain it all to you here, but I was thrilled that he spent a good part of his talk at our conference discussing this particular work of art.  He spoke about the whole theme of the piece, and the whole process of creation.  Totally fascinating.  I wish my photos did it justice!
 Which way is up?  There were many reflective surfaces inside the Airstream.  The hooded young man in the photos is my son, and next to him below is my husband.  And that's me taking the pictures, of course. 


Unfortunately, due to a camera glitch, I have very few photos of the rest of this piece, and all the totally outrageous stuff you encounter in the Airstream, so I recommend, if you ever have an opportunity to visit Mass MoCA during the spring/summer/fall months, make sure you look for this piece.  It is outside, and a little funky to find, but totally worth the effort for the marvelous experience.