Sunday, November 30, 2014

My Sheetrock Carving Workshop

 
 A week before Thanksgiving, at my annual state conference, I taught Sheetrock Carving in a 'Friday After Dark' workshop.  These are extended, hands-on after-dinner workshops, from 8:30pm-11:00pm, though my participants didn't actually leave until almost 11:30! When I recently mentioned this workshop in the Facebook Art Teachers group, I received a lot of questions, so I thought I'd give a quickie rundown here of the process.

The two masks at the top of the post, and the landscape and cartouche below are my personal examples, made for lessons done with my 6th grade students in past years.  The two masks above were painted very differently from each other; the one on the left was done with acrylics and is covered with a coating of an acrylic gloss (it might be ModPodge; I'm not sure).  The one on the right was painted with watercolors.  It gives a very interesting and subtle effect, I think.
 
The landscapes were an assignment covering multiple topics: students learned about relief carving, they used perspective to create depth, and they explored working with limited color choice.  The main painting was monochromatic, using values of one color of their choice.  They were allowed to add a pop of the complementary color (in various values) in one or two places in their landscape. The piece shown above was painted with acrylics.  It is a relief carving (as are all these pieces), though unfortunately it is hard to see the relief in the photo. The kids' work on this landscape project was lovely, their color choices were unique, and unfortunately I don't seem to have a single photo of the work.  Nor do I have photos of the students' carved masks. 
 I do, however, have many photos of student cartouche carvings.  You can see them in other posts on this blog, as I've actually posted about Sheetrock carving on this blog several times before.  You can find all the other posts (including one written after a workshop a year ago, and ones with student work from prior years) by following this link.  Meanwhile, here is a sample of student cartouche carvings.
In the workshop, we began by removing the paper surface from the Sheetrock, leaving on the cardboard backing.  To remove the paper, wet the surface with a sponge, let it soak in for a minute, and begin peeling.  Repeat.  You can use your thumbs, or you can use an artgum eraser to help remove the paper.
 Once the surface paper is removed, you are ready to carve.  Students can draw their plans and trace them onto the Sheetrock (once it is dry) with carbon paper, or draw directly with pencil.  Since we did all our work in one evening, participants drew quickly with pencils or proceeded with no pre-drawing at all.
 The workshop participants had some pretty creative ideas!  There was the hammerhead dog (above) and also a mermaid bunny, which you will see pictured later in the post.  What do we use for carving tools?  Preferred tools include a variety of sizes of U and V gouges (we've used both woodcarving tools and old linoleum cutters), sharp liner tools or some other pointy tool, and also heavy duty loop tools.  Because you work with the surface moistened, the tools don't slip as easily as on linoleum, meaning it really is rare that someone gets hurt with a cutting tool.  
On Facebook, people expressed concern about dust.  This is NOT an issue.  We keep the surface of the Sheetrock moist when carving, so no dust is produced.  Yes, it is messy; NO, it is not dusty!! 
Sometimes, the material may crack or break in unintended places.  You can either attempt a repair (mix up a small batch of plaster to patch), or glue any cracks when done.  My students liked the glued cracks, because it helped make their pieces look ancient.  Sometimes, though, an unintended break may necessitate a design adjustment, as in the mouth (above and below).  The artist was quite happy with her solution! Me too; I like the open mouth much better.
When carving was done, workshop participants had a variety of paints to experiment with.  The tree below was painted with acrylic.
 While this flower was painted with watercolor.   I think both pieces are lovely!
 Yes, it's the mermaid bunny! (below, painted with watercolor)
Other techniques we experimented with included painting the peeled surface with a coating of India ink prior to carving, and then carving into it, exposing the white gypsum.  I don't have a photo of the finished piece, but once the carving is done, the exposed white gypsum can then be painted with watercolor, and the whole thing can be sealed with an acrylic gloss if desired. 
  One last thing - if you do embark on carving Sheetrock, make sure it does NOT have fiberglass or some such filament in it, or it will feel like little needles poking into your hands.  All you have to do is hold up the Sheetrock and look at the edges.  You will see tiny clear/white hairlike pieces sticking out from the edge. Look carefully; they are small and almost colorless, but nasty!!  I purchased my Sheetrock at Lowe's in smaller more manageable sheets than the wall-size (maybe 36" square?), and while it was a little more costly to buy that way, it still is a very inexpensive item. 

Wednesday, November 26, 2014

Crazy Conference Weekend!! (an overview)

Not my shoes.  Wish they were.
The annual conference is over, and my body is beginning to regain some energy just in time to cook up a storm for thanksgiving tomorrow!  Oh dear, bad terminology.  I'm afraid the storm is what is currently happening outside.  Is that snow or mashed potatoes covering my trees and sidewalks?

Anyhow... This will be the first of a couple of conference posts, looking back on a whirlwind long weekend.  I represent our region on the state board of trustees, so my trip began with a board meeting Thursday night, prior to the official Friday morning opening of the conference.

Last year, it was my idea to institute a table that I named 'Bling Your Badge'.  With a marvelous supply of materials donated by Nasco and School Specialty (thank you!!!!), it was a great success that we repeated this year.  Everyone jumped at the chance to spend a few idle moments with a hot glue gun and wiggle eyes, jewels, shiny buttons, patterned foam, pipe cleaners, ribbon, pompoms, and more.  Here's a couple of name tag photos, starting with my own two-sided badge.
Buttons!  Super name badge!
So, I was basically in charge of this activity, and every chance I got, I stopped and 'manned' the table for a while.  It was so much fun seeing the enthusiasm of adults playing with sparkly things! The glue guns were working hard all day and evening!
Happy Badge-Blingers!
And then, I had signed up (as a certifiably insane person) to teach four workshops.  My car was totally full with materials for workshops(including laptop and projector), the Bling table, the basket raffle, and of course my suitcase. (Plus a bag o'shoes; my feet can be a problem.)  On Friday morning, I had my first workshop, 'Great Ideas with Unexpected Materials: from Toothpaste to Roofing Felt and Beyond'.  I had printed 40 handouts, and could have used more.  Meanwhile, because of the record snowfall in Buffalo, we had several scheduled presenters who were not able to make it to the conference.  So we were asked if we were willing to fill in some gaps.  I agreed, and in the afternoon I presented the workshop a second time, to another 20+ attendees.  (Reminder: if you are one of the people who therefore didn't get a handout, email me and I will send you the handout ASAP!)
Prior to dinner, we hosted our region's hospitality party.  Then, right after dinner, I taught a 
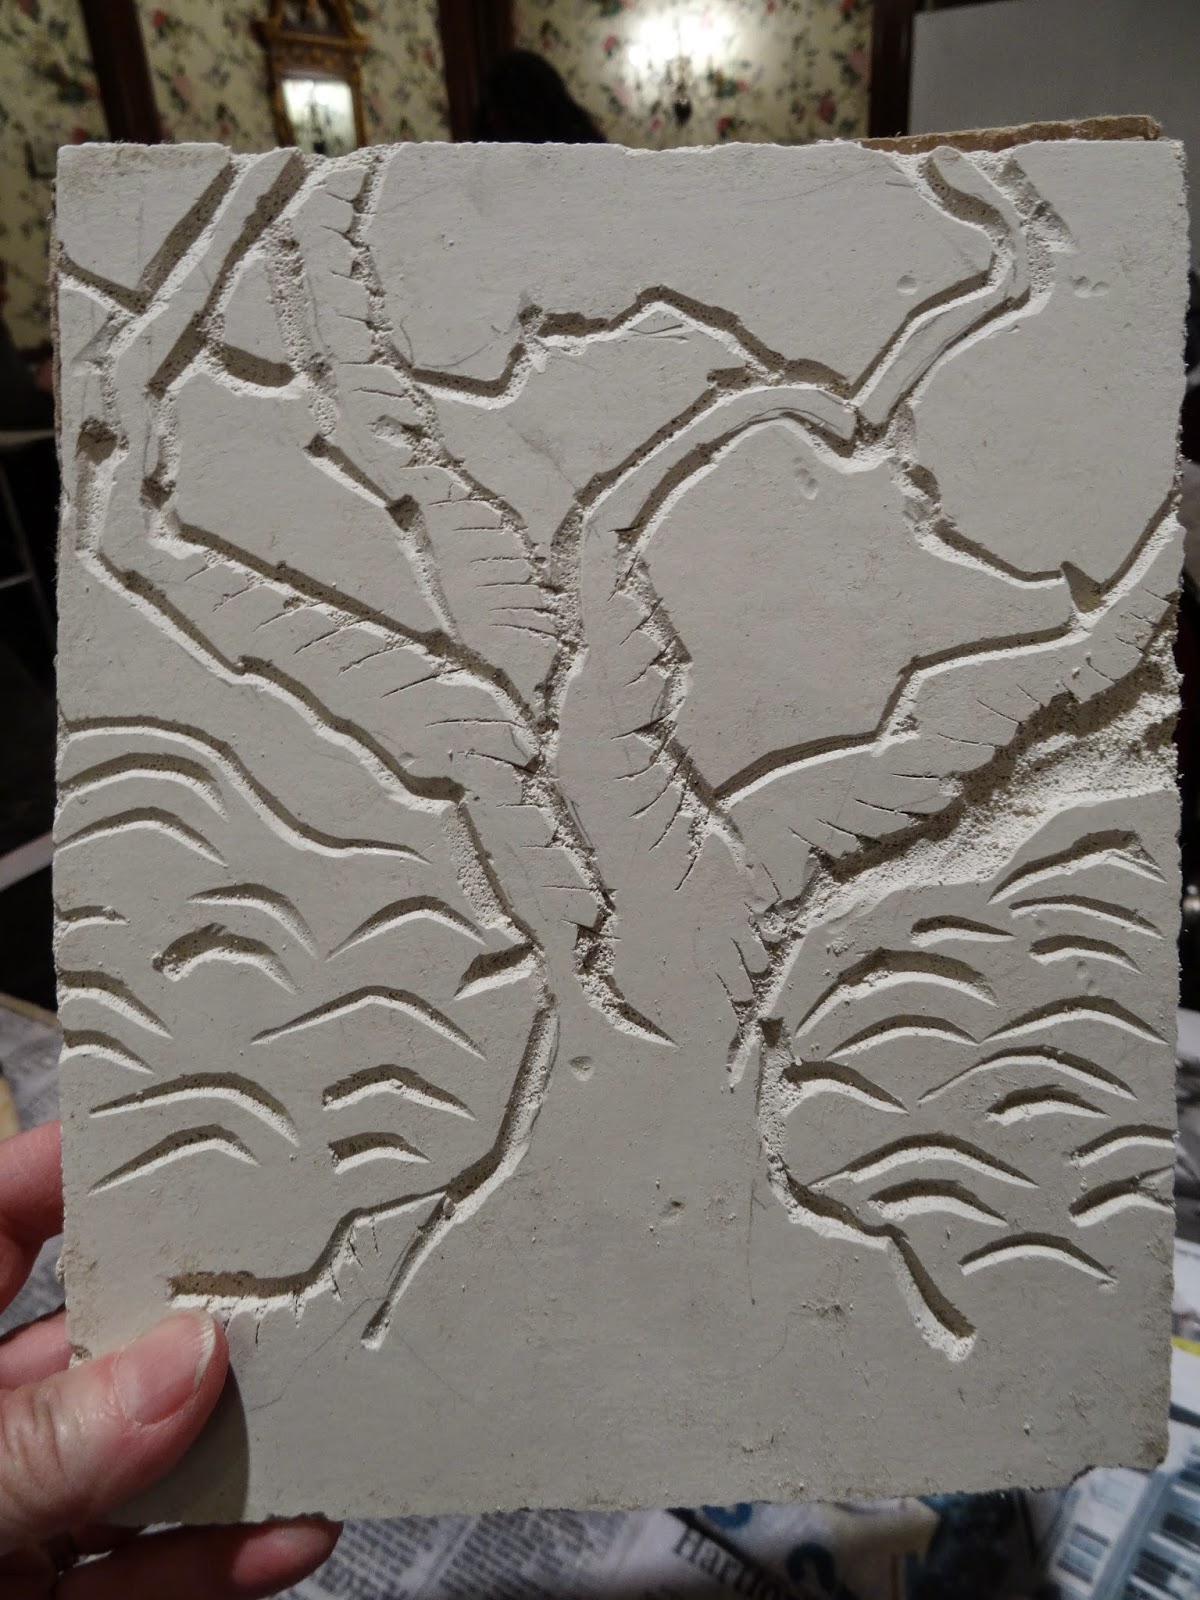
'Friday After Dark' workshop.  These are hands-on workshops that run from 8:30 to 11:00pm.  Except the people in my workshop (Sheet Rock Carving) didn't leave until 11:30!  I'll be posting a detailed post about this workshop probably by the end of the weekend.
Happy Sheetrock carvers!
Mustachioed scavenger hunt participants peeked into the Sheetrock workshop!
  Between teaching, transporting workshop materials back and forth to the hotel room, checking in on the Bling table, visiting the vendor booths, and more, I didn't actually attend a single workshop on Friday.  Seriously.  And I went back to my room exhausted, but with my brain firing like crazy.  I think I slept about an hour the whole night.  This is NOT an exaggeration.  (If  you were at the conference, this is why perhaps I did not look like my usual perky self on Saturday!)
Papier-mache workshop
 Saturday, I again taught a morning workshop to about 40 attendees, one of my favorite things ever (as you know, if you are a regular reader of this blog): 'Papier-Mache Made Easy: The Nitty-Gritty'.  And in the afternoon I taught another personal favorite: 'The Amazing Flexagon: Making Math Connections in Art'.  This was a double-session hands-on workshop and by the time it was over, a whole bunch of math-phobic attendees had successfully constructed a mobius strip, a trihexaflexagon and a tetratetraflexagon.  Yay!!
Flexagon workshop
 In the process of teaching, transporting materials, vendor visiting, looking at the member show and the student show, talking, eating and drinking, and cleaning up after the Bling table, I had by this point successfully knocked off another whole conference day without attending a single workshop or speaker.  And frankly, my feet were shot, my body was exhausted, my voice was spent, and I don't think I would have had the brain-power to pay attention to much.  Anyhow, most of the workshops that most interested me were scheduled either at the same time when I was teaching, or directly before or after, in rooms nowhere near my workshop space.  Due to the spread-out nature of the venue, and the tiredness of my feet, I just didn't make the effort.
Bling table: the aftermath.  One unclaimed (fake) cupcake

Two hands-on workshops that were scheduled concurrently with my workshops, but that I would have loved to attended: Tree Houses with Recycled Materials, and 3-D Weaving.  But from talking to people, and looking at their results, I think I should be able to figure them out.  
 You might therefore think that my conference was wasted; it was not.  After a 36-year teaching career, it is now more important to me to pass on some expertise and ideas to younger teachers than it is to attend workshops.  I had many wonderful conversations, and I'd say the conference attendees were enthusiastic and happy.  It was a wonderful conference.  And I did get to Sunday morning's keynote speaker, before the closing brunch, and I ended my conference by winning a set of black-light paints from the vendor raffle! 
I'm still standing!  Me and my partner-in-crime Kathleen at Saturday night dinner party

Thursday, November 13, 2014

Giant eyeballs?!?

 My DragonWing Arts students built some giant eyeball sculptures, though the choices they made, and therefore the end results, were not quite as I had intended.  But they are happy, so I guess I should be satisfied.  Pictured above are a couple of samples that I had built in preparation for the project.  The base is cardboard, and then I added paper bowls to make the protruding center.  I cut a hole in the center of the blue eye, and painted the inside black.  I hot-glued on the plates, and then papier-mache'd over the entire thing. 
I cut eyelids from sheets of colored foam and glued on and added eyelashes from pipe cleaners.  The yellowish eye in the top photo (and in the photo below) is intended to be a dragon eye, but it is not complete.  For the eyelids, I am considering using some orange SmartFab fabric samples that I have, because it looks cool when I twist and layer it it.
 Below, the students' papier-mache is drying.  As you can see, two of the kids decided to make round eyeballs.  They all chose to cut openings for the pupils, and I gave them the option of gluing a CD inside, with a circle of black foam over the center.  One student got really wacky with layers of colored sheet foam in the pupil.
 
While the papier-mache was drying on our eyeballs, we used papier-mache mash made from shredded paper mixed with Art Paste and Elmer's Glue-All to cover Styrofoam blocks that had bamboo stakes inserted in them.  (These were to be used for displaying the eyeballs.)  The papier-mache mash dried rock hard, and added weight to the Styrofoam blocks so they wouldn't tip over.   


When the papier-mache was dry, the eyeballs and bases were painted and embellished with colored foam eyelids, pipe cleaners or wire lashes, and glitter glue and rhinestones as desired.  They may not all look like eyeballs, but the kids are happy with their work, so I am too. 
Eyeball closeups:
Another one of my unfinished samples, with CD, foam circle, and jewel in center.

a painted base
a little bit of eyeball motivation!
Eyeball Sculptures are Complete!

Below, the boys are modeling their wacky eyeballs!