Wednesday, June 29, 2016

Plaster bandage direct cast mask!

My 9 year-old step-grandson has been bugging me to do an art project with him.  I suggested an old favorite project of mine, making a direct cast of the face.  So today he was dropped off at my house for two hours, giving us ample time to make the mask cast, to cast his fist in two parts and reassemble them, to eat a bowlful of melon, and even time for him to harass the cat!
We started by tying a covering over his hair.  A shower cap is a good alternative.  
Then we greased up his face with Vaseline, putting an extra-thick coating on his eyebrows.
We cut some plaster into various size squares and rectangles, and I got a bowl of very warm water and some paper towels. (The plaster sets more quickly quickly if the water is warm.)
I started dipping the pieces of plaster into the water, dripping off excess water onto the paper towels, and then smoothing them on his face, leaving his eyes exposed.  I made sure to fold the pieces that would be the outer edge of the mask, to make those edges neater and stronger.  
When I was done, he relaxed for a few minutes to let it firm up.  It didn't take long at all; as a matter of fact, the forehead was pretty solid by the time I was done with the chin!  When I thought the mask was dry enough to take off, I had him wiggle his chin a little, and then pulled I the mask right off his face.  It came off easily.  He went into the bathroom to scrub his face. 
I had suggested we cast a bunch of fingers to add to the mask like spikes, but he wasn't interested. Instead he said he wanted to make a cast of a fist.  I explained that I'd have to cut it in 1/2 to get it off, and so we decided to make it in two pieces.  First we cast the front, then the back, and then we used more strips to attach the two halves together.  The assembled fist is visible in the photo at the top of the post.    
He couldn't resist trying it on a few times while it continued to dry.  
The plan, I think, is to get together again next week to paint it.  I think he wants to add Wolverine claws to the hand, but I'm not sure about the mask.  I'd encourage him to add more details to alter it (horns, spikes, extra eyeballs, etc) but he's an impatient 9-year old and just wants to paint it.  He wanted to take it home to paint but his mom had to explain that she doesn't have the "right" kind of paint.
Tune in next week to hopefully see the finished products! 

Friday, June 24, 2016

PMC at Double H

I spent the day today as a volunteer in the Arts and Crafts building at the Double H Ranch, a camp for children with life-threatening illnesses, located, just 20 minutes from my home, in Lake Luzerne in the beautiful Adirondack Park of NY state.
Perhaps you've noticed the name Paul Newman on the camp sign above.  Well, Double H Ranch was the second of Newman's "Hole in the Wall" camps; Double H came about via a collaboration between Paul Newman and local philanthropist Charles R. Wood.  The lovely little lake you see in the other picture above is Lake Vanare.
 I first explored PMC (precious metal clay) three years ago at the Adirondack Folk School in Lake Luzerne, and I blogged about it here, and here; I've subsequently taken more classes in specific techniques, including hollow forms, and also bracelets and enameled PMC, which I didn't write about on the blog.  So it's no secret that I'm smitten with PMC!

Each summer, my PMC teacher packs up her entire studio of tools and textures, dehydrator, kiln, and more, and spends several days throughout the summer working with the kids at Double H to make themselves unique silver jewelry mementos.  Today was the first time I was able to join her as a volunteer, and it was also my first time at the camp.  We worked with older campers today, girls of  I'm guessing around 14 years old.  The necklaces pictured below and at the top of the post were made by a couple of girls I worked with.
The heart/date necklace pictured directly above, and the one with the triangle and circle at at the top of the post (some sort of secret personal meaning to the symbolism!) were both done by creating the image first on a piece of scratch foam, and then pressing rolled out PMC clay into the design on the foam, to create a raised image.  The paw prints and dragonfly were stencils that had been cut into textured wallpaper (the girls were all from the Bear cabin, so paw prints were a popular motif today).

After the girls finished making their pieces, and went to lunch and then rest period, we filed the rough edges, drilled holes, and went to lunch while the pieces fired.  When we returned, we went to work adding patinas as desired, polishing, adding jump rings, and hanging the pendants onto necklace cords.  I hope the girls are happy with their finished pieces!  I think they are awesome!!  Below, a few pieces from a different table of girls, who chose not to have patinas added to their work. 
 I unfortunately did not photograph the rest of the pieces made by the 15 girls who came today.  The variety was spectacular, from rings with stones, and charms with flowers, to Double H emblems, and all sorts of other interesting designs and shapes.  It was a terrific day.  Here's a few more camp pics:
 By the way, about a year and a half ago, Robert Irvine and the Food Channel's Restaurant Impossible came to Double H and did a makeover of the kitchen and dining area at the camp!  It was an exciting time, and an enormous amount of kitchen equipment as well as waterfront equipment (pedal boats and more) was donated to the camp as part of this awesome makeover!  
 One last thing - I will admit that I went to the camp today with some trepidation.  I did not know what kinds of kids I'd be encountering.  I have a tendency to get very caught up in sad stories and can be emotional about the trials that kids shouldn't have to deal with, and was worried I might get upset by tragedy.  But, the truth is, other than a couple of wheelchairs and a visible hearing aid, the medical challenges faced by these kids were not visible.  The girls I worked with appeared as happy, normal teenage girls away at summer camp having fun, which is the magic of a camp like this.  The camp is a place for them to feel like normal kids.  The only thing someone might have noticed, different from other camps, was the excess abundance of adults - besides the 8 PMC volunteers, the 15 kids arrived with 4 or 5 counselors with their group;  these were college age boys and girls who are immensely well-prepared for the unique challenges posed by working with kids with life-threatening illnesses.    I will definitely return to volunteer with the PMC teacher when I am able to! 

Friday, June 17, 2016

Warm and Cool 3-D Cityscapes

 Yes, I know the windows are totally incorrect in the painting above. Ignore it.  The 3rd grade artist who painted it was happy and so am I.  Below, another 3rd grade painting.
I realize this is a project you've likely seen posted in many variations, on all sorts of blogs, including right here on this blog!  But anyhow, I thought I'd share the variation done recently by the two second graders and two third graders who attended my spring "Scapes" session of DragonWing Arts, that I've talked about before on the blog.  These, obviously, are cityscapes.  The next two paintings below are by 2nd graders. 
It is "fake perspective" - a way to get young kids to make things look 3-D without actually teaching them about vanishing points yet.  I like to wait to teach linear perspective until the 4th grade, when I think the kids are beginning to be developmentally ready to understand the concept.  Still, there will be some kids won't "get it" then, or ever....
We began by drawing arrows pointing straight up, and then drawing a line straight down from each point of the arrow until it meets the bottom of the paper, or until it bumps into another building on the way down. 
Once the drawings were done, I gave them warm colors of tempera, and told them they could paint either the buildings or the sky, but not both.  One child chose a warm sky, and the other three picked warm buildings.
In a subsequent class session, I gave them just cool colors, the paint the opposite part of what they'd previously painted.  I didn't take pictures of the kids that day, because they wanted to keep their work secret from their parents until the last day of class!  They knew I'd be posting them and that their parents would look!
Finally, the kids used long cotton swabs to outline.  I gave them white and/or black paint; one student chose white, two chose black, and the fourth selected to use both black and white.  We were down to the wire getting these done, or I think the kids would have added more windows and details, but honestly, I think they are fun just the way they are, especially with the limited time we had!  We quickly glued them on black construction paper and finally onto pieces of bright colored tag for display.  We were in such a tight squeeze getting these done, I rushed to shoot pics of the finished pieces, which is why they are not flat and straight in the pictures above!  But as you can see, in the photo below, my students were quite proud of their completed work!!!

Saturday, June 11, 2016

No kiln? No problem! It's air dry clay day!

Let me say it up-front.  Clay's not really my thing; when it comes to building in three-dimensions, I'm more of a papier-mache / plaster bandage sorta gal.  My clay experience is limited; I took one class in college, while home for the summer, and then for the next 8 years I taught high school photography, drawing, and painting  Somebody else taught the clay classes. (Above, slab big-mouth fish, and below, slab faces; both are in Marblex air dry clay.) 
Home to me was Saratoga Springs, where Skidmore college is located.  They had a very respected ceramic artist teaching the class, and I was out of my element.  I was used to a state university budget and life and suddenly I was at an exclusive private school.  I went to work as a waitress in the evenings, and in class was surrounded by spoiled rich kids who ignored this little hippy-dippy 'townie'.  I never fell in love with clay.  However, I did enjoy the potter's wheel, (though I couldn't raise a decent pot any higher than my hooked-together thumbs).  I have a memory of my waist-length pony tail spinning around the wheel in the clay, and of my mother's horrified look and her demands for me to remove my shoes immediately and get in the shower when I walked in the door after class.  (Below, pinch pot turtle pot in air dry Mexican Pottery clay.)
Nevertheless, when I began teaching elementary art, I felt it was important for kids to have at least one clay experience every year.  My classroom did not have a kiln, so I learned to use air-dry clay successfully by trial and error, and in this post I want to share what worked, in case you are also in a kiln-less art room.  I located all the pieces pictured here a couple of weeks ago, when I was subbing in my former classroom.  They are all samples made by me, using air dry clay.

First, the clay.  I am NOT a fan of creepy Model Magic, though I know some of you love it, and use it in interesting ways.  For me, it does not mimic the texture and feel of clay, and lacks the solidity of a genuine clay piece.  I have experimented with several types of air dry clay, and pretty much settled in with Amaco's Marblex (a very paintable pale gray color) and Mexican Pottery Clay (a nice red-brown color).  The photos in this post are of clay pieces made with these two air dry clays.  I tried less expensive "store brands" and found they did not hold together well at all.  I tried more expensive brands and liked them, but they weren't affordable for what I wanted to do.  I'm struggling to recall the name of one excellent quality clay that dried rock hard and bright white.  Very durable, in comparison, but also very pricey....  Also, several years ago I received a sample of some dark reddish brown air dry clay with a lot of grog in it, that dried rock hard, and after sampling it, I really loved the texture and consistency and quality.  But I was never able to find it in a catalog, so I've long forgotten the brand name.  (Below, pinch and pull gator, Marblex; and  unpainted dragon, unknown brand hard white air dry clay)
Air dry clay is always going to be more breakable than kiln-fired clay.  The best way to use air dry clay with minimal breakage is by having no thin appendages, and by making pieces in just one session.  You can use slab construction, coil construction, and of course pinch pots, as well as pieces made by pinching and pushing, such as the gator, above.  And you can mix the clay with water to make slip.  So basically, it still can very much mimic the sensation of working with 'real' clay. 

In order to get a clay project complete in one art class, a good idea is to use the prior art class for "clay play", to familiarize the students with the materials and the techniques, and also to demonstrate what they will be doing in their next art class.  That way, in the next class, all you need is a quick review and away you go!  I always had blocks of clay measured out and ready for the kids, so they could get right to work.  The "
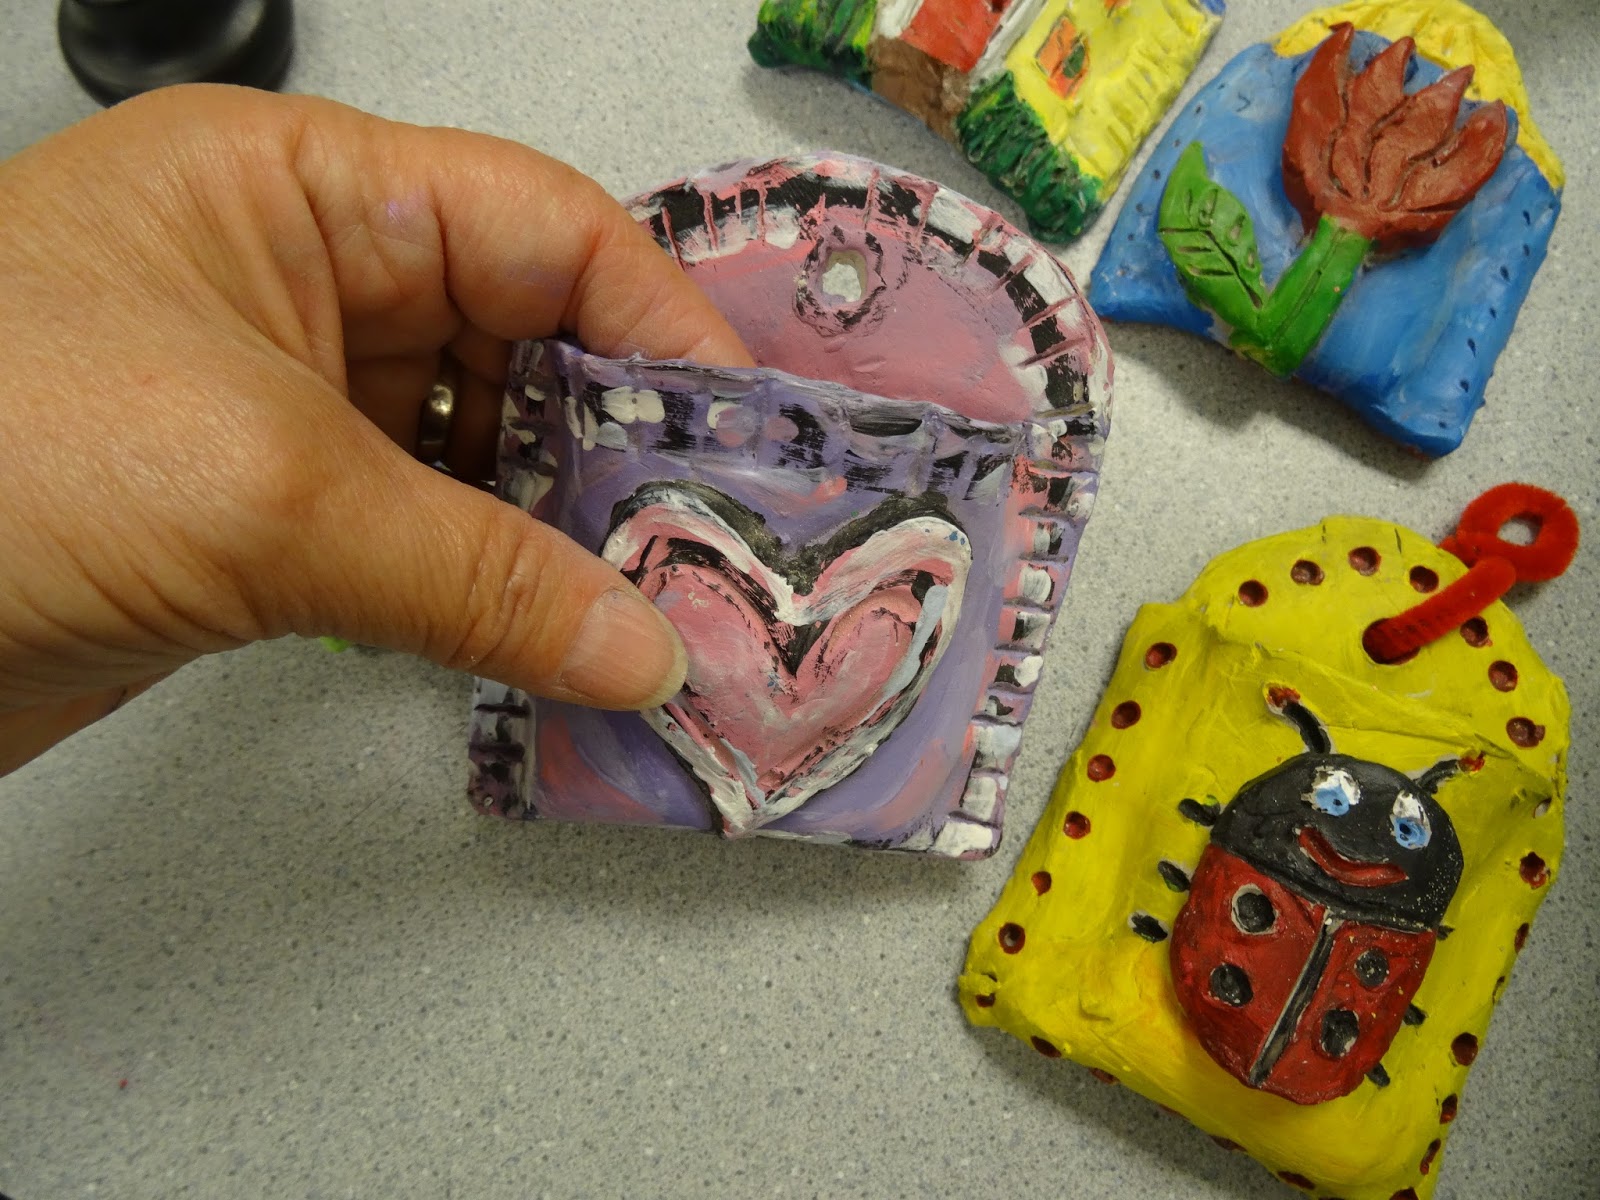
posy pockets" pictured below are an example of an air dry project that was successful.  I often did this with my 2nd graders.
To make these, students rolled out a rectangular slab, trimming off any excess.  They scored close to the long edges, put slip on the scored edges, and then folded the pocket, leaving about a third or quarter of the rectangle above the fold, and keeping a couple of fingers inside when they folded. Then, the top was trimmed to an arc or peaked shape, and any remaining clay after trimming was used to make embellishments, which were attached by scoring and putting on slip.  I had the kids put two fingers in the pocket and gently wiggle the decoration into place, as though they were playing with a peanut butter and jelly sandwich and wanted to get the jelly to squirt out the sides.  This way, the embellishment would stick better.  We also used tools to add texture, and cut a hole in the top for hanging over a nail. 
The posy pockets (and pretty much all air dry clay projects) were painted with acrylic paints; I used Nasco's Bulk-krylic.  The kids were cautioned NOT to use air dry clay for food or liquids; it is not permant.  So we made tiny tissue paper bouquets of posies, with pipe cleaner stems, to put in the pockets.
The fish above are a slab project similar to the posy pockets but requiring a bit more sophistication.  Instead of putting our fingers inside, we stuffed the mouths with paper towels.  Again, excess clay was used for embellishment.

The fish below were a ridiculously easy slab project.  Again, a slab was rolled out.  I demonstrated how to cut the slab to make tail and fins and mouth, and again extra clay could be used for embellishment.  The fish body was curved to stand up. 
We made clay people using a similar process, starting with a rectangle, cutting away squares from the both sides of the top to leave a head, and vertical rectangles from both sides of the bottom.  Then slits were made straight up from the corner of where the rectangle was cut, to create arms, and a slit was cut in the bottom to create legs.  The bodies could then be molded and posed by bending and pinching the clay.  We used this process because air-dry clay is much more breakable, and if slip and score techniques are not used well, add-ons will fall off.  So working with a one piece pull and pinch construction with younger kids was very successful. 
We made a lot of crawly critters this way - lizards and dragons and alligators and turtles and such, as well as animals lying down, like cats and dogs.  This way, we avoided the narrow appendages snapping off.  Still, sometimes they will break.  Glue generally does NOT hold air dry clay.  The best solution I have every found is using the acrylic paint to repair breakage.  So, when the tail of the critter below broke off, I fixed it by filling the gap with green acrylic paint.  In worst case scenarios, we'd joke about the art room being a hospital for injured animals, and "Dr. Brown" (me) would fix them, and add a little band-aid for extra security!
My fourth graders usually made coil pots, using the Mexican Pottery Clay.  Their work was much larger than my quickie samples below.  We used scoring and slip and the peanut butter and jelly wiggle again!  Snails could be made and worked into the pot as desired, by placing a coil up and over them to secure them.  I had the kids frequently hold them up to the light to check for gaps, and then wiggle the gaps closed.  I gave each child a hunk of clay to start, they rolled the base, and then started adding coils.  If they ran out of clay, they could come for another hunk until we ran out of time.  Some students made small pieces with fine coils, others made big wide or tall pots.  My samples are small because all I did was a quick demo of coil technique. 
Again, we painted with acrylic, and used it to fill any gaps.  Acrylic paint makes the piece stronger. By the way, the kids could choose to leave the clay color exposed, but then would use an acrylic gloss such as Mod Podge to paint over it.  For tall narrow pots, we poured in the gloss or paint, tilted it around to cover the inside, and then drained out the excess paint. 
 And of course, we made pinch pots.  (But no, I never made a single pinch pot owl.  Sorry...)  These "pinch pot clusters" pictured below were a favorite of my first graders, to take home and store their tiny treasures.  They made three little pinch pots, scored and used slip to hook them together, and smoothed over the joints. 
 And we sometimes made cave paintings on random shaped clay slabs.
 Finally, a quickie easy project, that was always a lot of fun.  Sneaker imprint jewelry!  The kids loved pushing clay gently into the bottom of a neighbor's shoe, and then cutting them in interesting shapes.  After these were dry and painted, we strung them with yarn and beads and more. 

Late edits to this post - four points to make:

First - There is NO REASON to wedge air dry clay, since you won't be firing it and don't have to worry about it bursting.   Actually, it is counterproductive, as it dries it out.  

And second, try to finish everything in ONE SESSION.  Keeping air dry clay properly moist and to a workable consistency once it's been out in the air is very difficult.  Just get it done, and move on... You'll have trouble trying to continue working successfully on an air-dry piece after one sitting.  

And the tools - you can use inexpensive plastic modeling tools, for scoring and texturing, as well as little pointed wooden sticks, and also, of course, slip made from the clay.

And finally, getting them home safely - I would ask students to bring in cube-style tissue boxes, which were great for bringing home coil pots, for example.  We padded them in newspaper or other stuffing material before gently putting in the box for safe travels.  I always warned kids against putting clay projects in the bottom of their backpacks, where they'd throw lunchboxes and sneakers on top.  For the little pinch pots and other small delicate pieces, if I had nothing to pack them in safely, I told the kids to carry them in their hands like they were baby birds, who hadn't yet leaned to fly.  If they fell out of the 'nest', they probably would be injured.  I loved seeing them walk to the school buses, cradling their 'baby birds' in their hands!

Monday, June 6, 2016

Lovely Lilacs Revisited

I subbed in my former classroom for a day recently, so that the current teacher could deal with a medical concern.  I had fresh lilacs growing in my yard, which, when I was still teaching, I brought in every year for a one-day lesson for my younger students, usually the first grade.  I told the teacher I'd love to paint the lilacs with her students, with her permission.  The 2nd grade students had just finished a project, so rather than have me start her next project for her, she gave me the go-ahead to do these paintings.
So I brought in a batch of the lilacs and put them in vases.  The kids looked at and smelled the flowers, examined how they grew in bunches, and how the leaves came to a point.  We looked at several different vases in the room, with various shapes, and discussed how even though each one was different from the next, the shapes were all symmetrical.  Some were opaque, and some were transparent, and we looked at that, too.  Then we talked about how we didn't want vases of flowers floating in the air, so we wanted to place them on a table in our drawings. 
The kids drew a vase, stems, leaves, and table, using crayons on construction paper (I gave them a selection of colors of paper to choose from: lilac, pale blue, soft green, pale peach, and soft yellow.  Looking at these photos, I realize that if anyone chose the yellow, somehow I didn't photograph it!)
Before the kids came in, I mixed up some tempera paints in disposable cups with various lilac colors, some with more pink, some with more blue, some lighter, and some darker.  I discussed with the kids how there are many different varieties of lilacs, with colors from white to purple to pink to blue, and that they could use any of the paint on their tables for their flowers.
I gave the kids long-handled cotton swabs to paint their flowers.  We noted that the tip spread out as is was used, making it easier to paint the flowers than with the small tip we began with! 
We had just 40 minutes, including the time I needed, as a sub, to review the class list of names, and time to clean up.  (Clean up was pretty easy, since the swabs were simply thrown away, and at the end of the day I also threw away the disposable paper paint dishes.  We put the paintings in the drying rack and did a quick table cleanup and we were done!)
As a veteran art teacher, I didn't generally like to repeat all the exact same projects every year.  But there were some lessons that, with some simple variations, were an annual ritual.  The lilacs were one of these.  There were staff members that looked forward to seeing them hanging in the hall every year, and since they were quick and easy, and made everyone happy, I loved to oblige by repeating this project.  They look so fresh and spring-like, and sometimes I think I can smell the lilacs when I look at at them!  Thank you to the current art teacher for allowing me and the students to have this fun break from her curriculum!